


This guide covers the general, manufacturer-safe way to install a stroller car seat adapter after the pair is verified. It does not replace the manual for your exact stroller and adapter SKU, and it should be read with the same caution as official charts and notes.
The same caveats keep showing up across brands: some installs need canopy removal, some change with seat facing direction, and some depend on a Product ID prefix check. If a note, footnote, or asterisk changes the steps, stop and follow the source for that model.
- Start with the Verified Fit and the Right Adapter
- Gather the Stroller, Seat and Adapter Parts Before You Start
- Install the Adapter on the Stroller Frame
- Attach the Infant Car Seat and Confirm the Lock
- Follow the Recurring Manufacturer Caveats
- Finish with a Safety Check Before You Roll
- When to Stop and Use the Manufacturer Source Again
- Frequently Asked Questions
- Conclusion
Start with the Verified Fit and the Right Adapter
Before you open the box, make sure the stroller, the infant seat and the adapter already have a verified fit verdict. This guide does not guess compatibility or repeat retailer copy, and it does not replace the exact manual for your stroller model and adapter SKU. If you have not checked the pair page yet, start with the verdict page or the adapter page, then come back here for the install method.
The same three caveats keep showing up in manufacturer instructions: canopy removal, facing direction, and Product ID prefix checks. Those details can change whether the adapter fits at all, or whether it fits only with the canopy off. If your stroller is a double, also check whether the adapter belongs in the upper or lower position before you start, since that changes the install path.
Use the general method in this article only after the fit is confirmed. For the exact part layout, latch points and lock sequence, follow the manual for your stroller and adapter, and use the source notes on the pair page if anything in the box label or chart does not match what you expected.
If the stroller, seat and adapter do not line up with the manufacturer source, stop there and recheck the model numbers. That is the safest boundary before any assembly begins.
Gather the Stroller, Seat and Adapter Parts Before You Start
Lay out the stroller frame, the infant car seat, the adapter pieces, and any receivers or brackets that came in the box. Put every part where you can see the labels before you snap anything together.
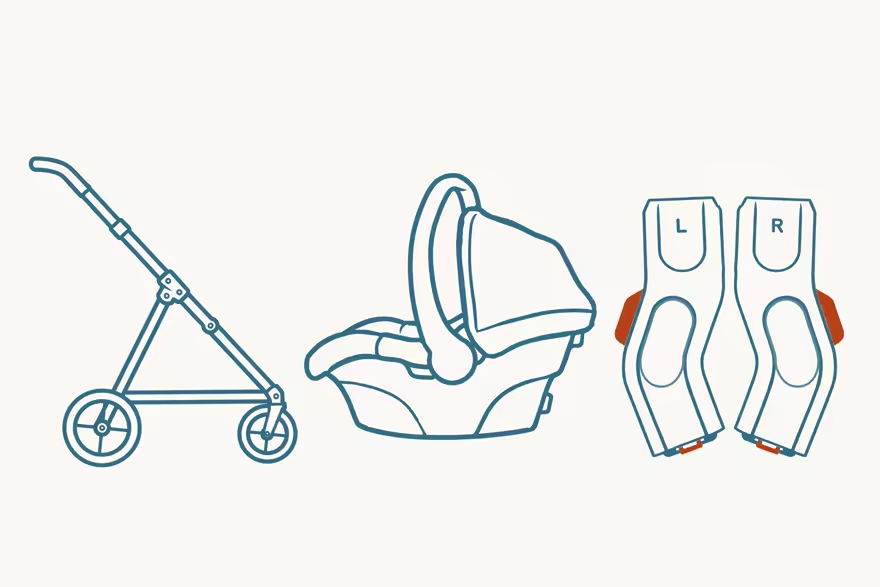
Check the manual for the exact stroller model and adapter SKU, not a sibling product with a similar name. Baby Jogger adapters are a good example here, because the chart row has to match the printed adapter name or SKU exactly.
Look for left and right marks, orientation arrows, and any parts that only fit in one position. If you are using the same stroller for a double setup, read the note on how upper and lower positions change the installation before you place the brackets.
Set the stroller on a flat surface and lock the brake before assembly. That gives you a steady frame while you fit the adapter and keeps the stroller from rolling while you work.
Install the Adapter on the Stroller Frame
Align the adapter with the stroller's mounting points first, then follow the motion your manual shows, whether that means pressing, sliding, or snapping it into place. Some models use one upper mount, while others use left and right receivers or a frame bar, so the adapter should match the hardware layout on the stroller, not a guess from the box.
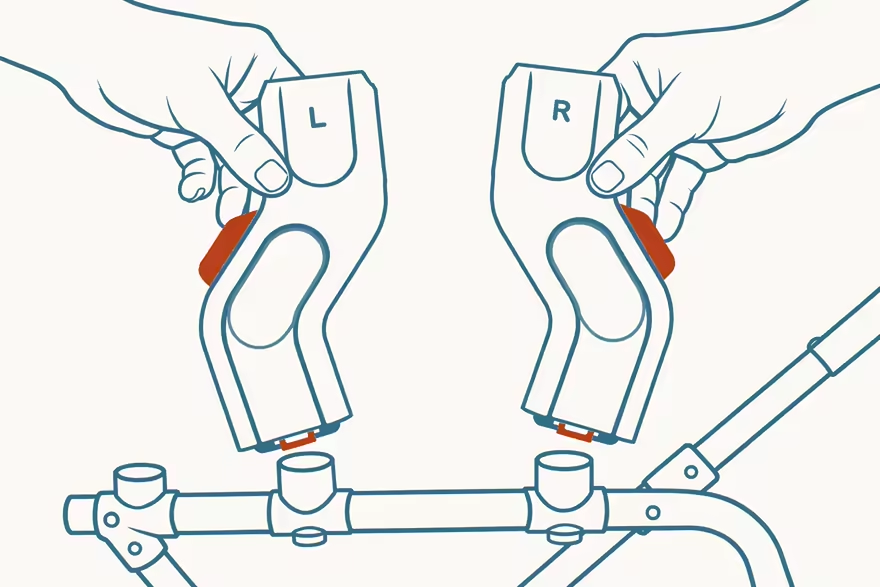
Push the adapter until it sits flush and feels even on both sides. If one side sits high, the fit looks crooked, or the lock feels partial, stop and reseat it before you put the seat on top.
Check both sides again after the adapter is in place, especially on frames with separate receivers. If your setup uses a double stroller layout, keep the position in mind and compare it with the guide for how upper and lower positions change the installation before you move on.
If the adapter will not seat cleanly, do not force it. Pull it off, line up the tabs or brackets again, and repeat the install until it sits square and fully engaged.
Attach the Infant Car Seat and Confirm the Lock
Set the infant car seat onto the adapter in the direction the manufacturer specifies for your model.
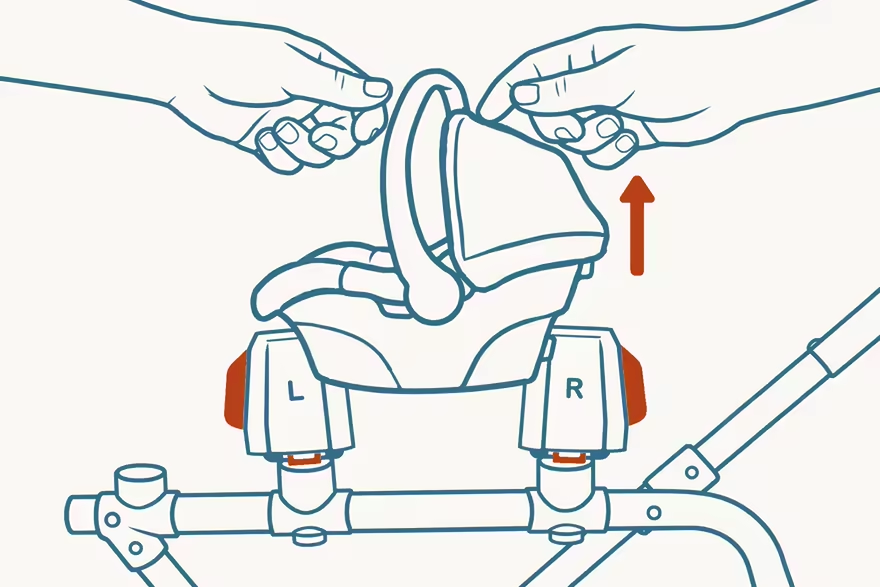
Press down until both sides engage and you hear or feel the lock. If the seat has a release bar or side latch, check that both sides seat at the same time, then stop and recheck the fit before you move the stroller.
Lift gently on the seat handle and the shell to confirm it is secure. The seat should sit fully on the adapter with no rocking, tilt, or gap at either side.
If it rocks, does not click, or sits unevenly, take it off and reinstall it. That same reset step applies when a chart or manual points you to a different setup, including the cases covered in Upper vs Lower Adapters on Double Strollers, Explained and our source and correction rules.
Follow the Recurring Manufacturer Caveats
Canopy notes change the install path on some models, so watch the chart footnotes before you keep going. Thule says the canopy must come off before the infant seat goes on its adapter for every listed Urban Glide 3 fit, single and double. Baby Jogger marks the same condition with an asterisk on adapters 2083982, 2083994, 2104668 and 2104669, while 2083981 and 2170584 do not carry that note.
Facing direction is another place where you should stop and read the source line again. The only verified direction rule in this dataset is BOB Gear's Renegade Wagon adapter S14685500, where the infant car seat can face either side of the wagon. Thule prints a facing-direction footnote too, but the direction itself is not stated in any verified source, so do not guess.
Product ID prefix checks matter on BOB Gear. Match the stroller label or manual prefix to the chart row first, because two strollers with a similar name can land on different rows and need different SKUs. If the chart uses a note, asterisk, or prefix rule, stop and recheck the manual before you buy or install.
Do not swap sizes or positions. A Single adapter will not fit a Double stroller, a Double adapter will not fit a Single, and upper and lower adapters are different products shaped for different mounting points. That is the same reason the article on how upper and lower positions change the installation matters when a double frame is involved.
Finish with a Safety Check Before You Roll
Before you roll, check the brake, wheel clearance, and handle clearance with the seat attached. If the stroller shifts, rubs, or feels crowded, stop and reseat the adapter before you move on.
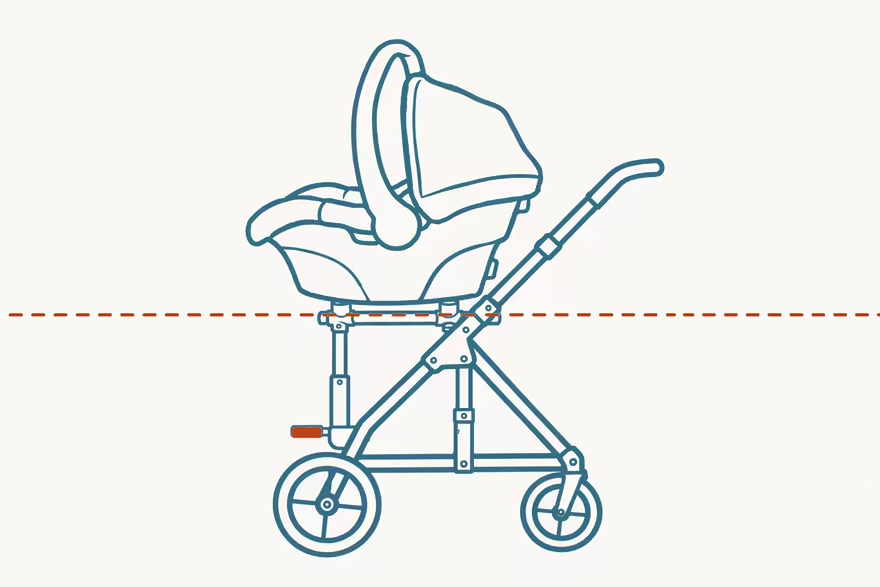
Look at the fold next. Make sure the adapter does not block storage basket access or second-seat placement, and confirm the fold still works the way your manual says it should. The dataset notes fold limits as a general adapter caveat, but your manual sets the exact limit for your model.
Set the infant car seat in place and check that it sits level. Then secure the baby according to the car seat manual, because the stroller adapter does not change the seat's own harness or buckle steps.
If anything feels loose, remove the seat and start over instead of forcing the fit. That is the point where you go back to the manual, or to the linked notes on when an adapter is required versus a direct fit if you still need to confirm the setup.
If the stroller is a double, check the placement again against how upper and lower positions change the installation. A quick recheck now is easier than finding a wobble after you are outside.
When to Stop and Use the Manufacturer Source Again
If the chart row is missing, that is not proof the pair does not work, but it is also not a reason to guess. Go back to the stroller manual, the adapter page, or the fit verdict page and follow the source that names the exact stroller, seat, and adapter.
Region differences, legacy parts, and product page errors do happen. If the official instructions conflict, use the source that applies to your exact model and do not treat an unlisted setup as approved.
That is the same rule we use in the guide on when an adapter is required versus a direct fit, and it is the same rule here: if the source does not say it, do not assume it is allowed.
Frequently Asked Questions
Should I Remove the Canopy Before Installing the Adapter?
It depends on the model. Some manuals call for canopy removal, while others mark it with an asterisk note. Check the manual for your exact stroller before you install the adapter.
What Should I Do If the Seat Rocks After It Clicks in?
Remove the seat and check that both sides are fully seated, then try again. If it still rocks or sits unevenly, stop and use the manual for your exact stroller, seat, and adapter.
Can I Use a Single Stroller Adapter on a Double Stroller?
No. Single and double adapters are not interchangeable, and upper and lower adapters are different products. Use the adapter made for your exact stroller and position.
Conclusion
Once the seat clicks in and sits level, the install is done only if the checks still hold. A firm lock, a level seat, and a frame that stays put on a flat surface are the signs to trust, not how quick the setup felt.
If anything feels loose, uneven, or unclear, take the seat off and go back to the manual for that exact stroller and adapter. That pause is the safe move, and it is also why a missing chart row is not the same as a no.